Life Cycle of React Components
In React, the lifecycle of a component refers to the various stages a component goes through while displaying the user interfaces.
Let’s understand what happens when a component is rendered on a webpage.
-
Mounting: Component needs to be loaded on the screen
-
Updating: When state changes, those changes need to be updated on the screen.
-
Unmounting: Finally when we navigate away from the component, the component needs to be unmounted from the screen.
These lifecycle stages allow developers to control and run specific code at key moments, i.e. when a component is created (Mounted), updated, and removed (Unmounted).
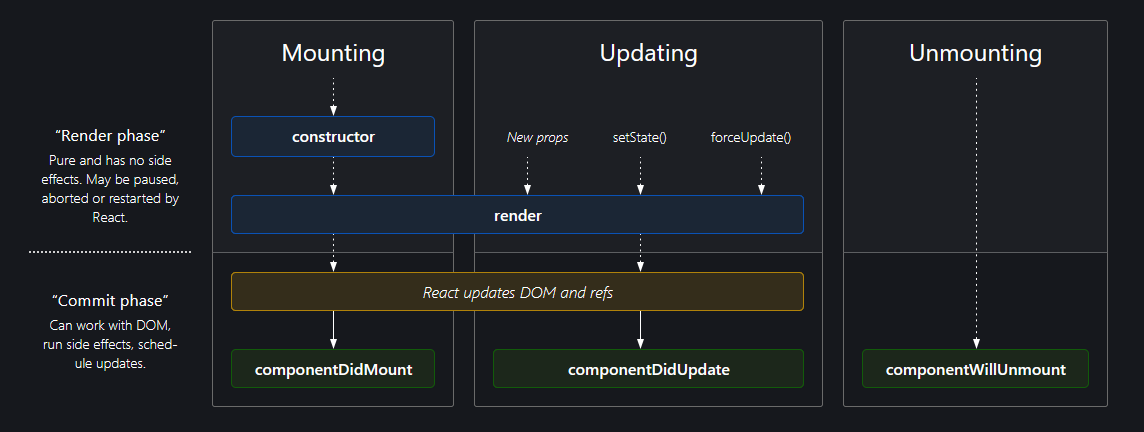
Fig: Lifecycle of React Components
Upon closer inspection of the above diagram and analyzing the different phases. You might now have a general idea of why React is fast. There are two phases during a component's lifecycle.
-
Render Phase: Pure and has no side effects. May be paused, aborted, or restarted by React.
-
Commit Phase: Can work with DOM, run side effects, and schedule updates.
So what does this mean?
Render Phase
During the render phase, pure functions i.e. functions that return the same output for the same sets of input, in this case, the JSX for displaying the React Component is rendered first.
But my JSX is dependent on my state value, which I get from the API.
Yes, this is the second stage and we will discuss this in the commit phase. But before the data is fetched from the API, there will be a loading or a shimmer screen, right? Even if there is no loading screen or a Shimmer UI, on some websites you might have seen that while the page loads, first the layout appears, and then after some time, the data populates.
This is exactly what the Render Phase does. It allows React to load pure components first providing a seamless user experience without worrying about the data layer.
Commit Phase
After the Render Phase comes the Commit Phase, i.e. working with DOM, running side effects, and scheduling updates. For instance, whenever we request an API, we need to render the result.
The commit phase does just that. After the render phase is over and the component is loaded on the screen, we need to update it with the appropriate values. The Commit phase allows us to update these values onto the DOM. Other than updating the values onto the DOM, we can also set up a subscription, and manually change the DOM in React components.
Loading the UI onto the screen
Generally, there are two approaches to loading the UI onto the screen while making an API request
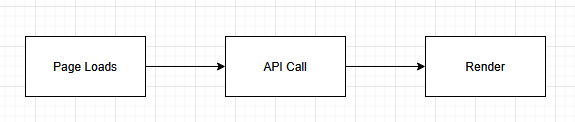
Fig: Option A

Fig: Option B
Which approach do you think provides a better UX? Of the above two approaches to loading the UI while making an API request, which approach do you think React uses? (Compare them with the lifecycle of the React Components diagram)
Yes, It’s the 2nd approach.
Fig: Option B
There are two render phases in the above diagram, now after knowing about the lifecycle phases and steps to load the UI onto the screen, can you tell where the Render and Commit phase fit into the above diagram?
In this article, we will only be discussing about 3 Lifecycle Methods. If you understand these three methods then you can breeze through the other lifecycle methods as well. We will be using class-based components as examples to help us understand the various lifecycle stages and it’s internal workings. So let’s get started.
ComponentDidMount
This method is called after the component is rendered in the DOM. It is the perfect place to make API calls, set up subscriptions, add event listeners, and do anything that needs to run side effects and schedule updates.
componentDidMount(): void {
// Make API CALL HERE
console.log("Component mounted");
}
The “componentDidMount” method is only called once, during the initial render. After the component has been mounted onto the screen, any changes made to the data layer are handled by “componentDidUpdate”.
ComponentDidUpdate
This method is used to keep track of state changes.
componentDidUpdate(prevProps: Readonly<{}>, prevState: Readonly<{}>): void {
if (this.state.count !== prevState.count){
console.log("State Changed")
}
}
As you can see we can compare the state changes in the ComponentDidUpdate method and perform the updates here.
ComponentWillUnmount
This method is called when we leave the page or when the element is removed from the DOM.
componentWillUnmount(): void {
// Run clean up here
console.log("Component unmounted")
}
We generally use componentWillUnmount to run the clean-up function. More will be discussed later.
Now let us dive in deeper. To better understand the lifecycle of React Component, as stated earlier, we will be using Class-Based Components as an example.
Examples
Let us consider a Parent and a Child Component. We need to render both the Parent and the Child Component which consists of a Counter (Inside the Parent Component) and a button to update the counter value (Inside the Child Component). We are trying to update the counter (state) of the Parent Component using the Child Component, i.e. Lifting the State Up.
We will gradually move toward the above-stated problem but first, let us just see what lifecycle methods run when only the bare components are rendered.
Parent Component
import React from "react";
import ChildComponent from "./ChildComponent";
class Parent extends React.Component {
constructor(props) {
super(props);
}
componentDidMount(): void {
console.log("Parent Component mounted");
}
componentDidUpdate(): void {
console.log("Parent Component updated")
}
componentWillUnmount(): void {
console.log("Parent Component unmounted")
}
render(): React.ReactNode {
console.log("Parent Component render")
return (
<>
<div>Parent Component</div>
<br/>
{/* Child Components Rendered Here*/}
<ChildComponent />
</>
);
}
}
export default Parent;
Child Component
import React from "react";
class Child extends React.Component {
constructor(props) {
super(props);
console.log("Child Component constructor")
}
componentDidMount(): void {
console.log("Child Component mounted");
}
componentDidUpdate(): void {
console.log("Child Component updated")
}
componentWillUnmount(): void {
console.log("Child Component unmounted")
}
render(): React.ReactNode {
console.log("Child Component render")
return (
<div> Child Component </div>
);
}
}
export default Child;
During the initial render, what do you think the output for the above code will be in the console?
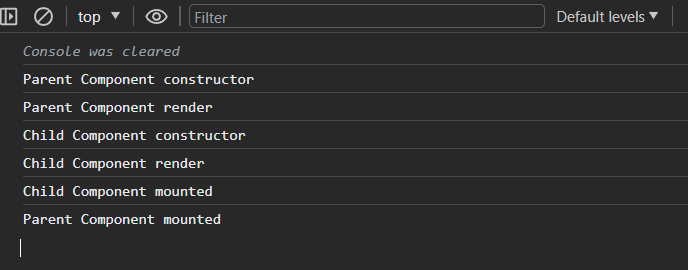
If you correctly remember about the Render and the Commit phase discussed earlier, the process is pretty straightforward, right? Let’s revise.
First, the Render phase is initiated and only then comes the commit phase, i.e. the components need to be loaded on the screen first and only then the data is fetched.
So what would the overall process look like?
-
First, the parent component is displayed on the screen. So its constructor is called and then its render method.
-
While rendering the Parent Component, React encounters the child component, so now it starts to render the child component, so now the constructor and the render method of the Child Component are initialized.
-
After the Child Component’s Render phase is over, it goes on to the Commit phase, so it calls the “componentDidMount” method and logs “Child Component mounted” onto the screen.
-
Now that the child component is fully rendered, the parent’s component Render phase is over. So all that’s remaining is the parent’s component Commit phase, so now it calls its “componentDidMount” method and logs “Parent Component mounted” onto the screen.
Pretty straightforward right? After understanding the different phases it’s quite easy, right? So now let’s look at a few more examples to test our knowledge and guess the output.
Example 1
Let us create a “userName” state inside the Parent Component. The “userName” state is updated from the Parent Component itself and is then rendered into the Child Component.
Parent Component
import React from "react";
import ChildComponent from "./ChildComponent";
class Parent extends React.Component {
constructor(props) {
super(props);
console.log("Parent Component constructor");
this.state = {
userName: "",
};
}
componentDidMount(): void {
console.log("Parent Component mounted");
this.setState({
userName: "The StackSmith",
});
}
componentDidUpdate(): void {
console.log("Parent Component updated");
}
componentWillUnmount(): void {
console.log("Parent Component unmounted");
}
render(): React.ReactNode {
console.log("Parent Component render");
return (
<>
<div>Parent Component</div>
{/* Child Components Rendered Here*/}
<ChildComponent
userName={this.state.userName}
count={this.state.count}
onCounterUpdate={this.handleChildCounterUpdate}
/>
</>
);
}
}
export default Parent;
Child Component
import React from "react";
class Child extends React.Component {
constructor(props) {
super(props);
console.log(this.props.userName, "Child Component constructor");
}
componentDidMount(): void {
console.log(this.props.userName, "Child Component mounted");
}
componentDidUpdate(): void {
console.log(this.props.userName, "Child Component updated");
}
componentWillUnmount(): void {
console.log(this.props.userName, "Child Component unmounted");
}
render(): React.ReactNode {
console.log(this.props.userName, "Child Component render");
return (
<div>
Child Component
</div>
);
}
}
export default Child;
Think of the output of the above code for a while.
The Answer
Let’s see what happens now
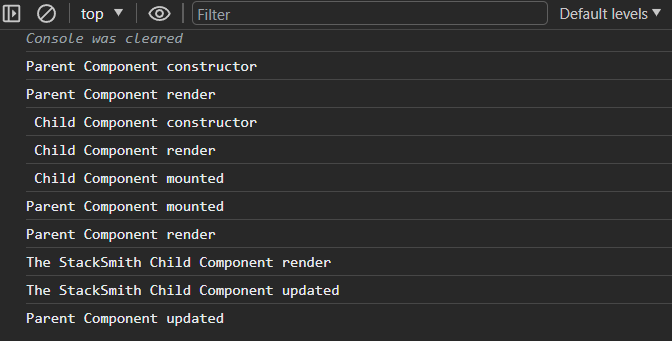
-
Firstly during the render phase, the parent component is rendered onto the screen, i.e. Parent’s constructor and render method are called.
-
Then the child component needs to be rendered, so its constructor and render method are called.
Since the props haven’t been initialized i.e. “this.props.userName” does not have a value yet, there is a whitespace at the beginning of the console.log().
-
Now the render phase is over and we move onto the commit phase.
-
So now the Child Component’s ComponentDidMount method is called and then the Parent Component’s ComponentDidMount is called.
-
When the Parent Component’s ComponentDidMount is called, the state changes and React needs to display the latest changes.
NOTE: After an update operation, React again re-renders the component.
-
So now the Parent Component’s render method is called again subsequently calling the Child Component’s render method as well and logs the following.
-
Parent Component render
-
The StackSmith Child Component render
-
Since the component has been updated with a new value, the child component now calls its componentDidUpdate method, instead of the “componentDidMount” method.
-
The StackSmith Child Component updated
-
Similar to how the Child Component called its “ComponentDidUpdate” method after the prop value was updated, the Parent Component also calls its “ComponentDidUpdate” method after the child component has finished rendering.
In this second example, we got into more detail about the lifecycle methods, right? Specially about how the ComponentDidUpdate method works and how it tracks the changes throughout our application. Now let’s go into more detail
Example 2
Let us add another “count” state inside the Parent Component. The “count” state is incremented from the child component using “handleCounterUpdate”. [Lifting the State Up]
Parent Component
import React from "react";
import ChildComponent from "./ChildComponent";
class Parent extends React.Component {
constructor(props) {
super(props);
console.log("Parent Component constructor");
this.state = {
userName: "",
count: 0,
};
this.handleChildCounterUpdate = this.handleChildCounterUpdate.bind(this);
}
componentDidMount(): void {
console.log("Parent Component mounted");
this.setState({
userName: "The StackSmith",
});
}
componentDidUpdate(): void {
console.log("Parent Component updated");
}
componentWillUnmount(): void {
console.log("Parent Component unmounted");
}
handleChildCounterUpdate() {
this.setState((prevState) => ({
count: prevState.count + 1,
}));
}
render(): React.ReactNode {
console.log("Parent Component render");
return (
<>
<div>Parent Component</div>
{/* Child Components Rendered Here*/}
<ChildComponent
userName={this.state.userName}
count={this.state.count}
onCounterUpdate={this.handleChildCounterUpdate}
/>
</>
);
}
}
export default Parent;
Child Component
import React from "react";
class Child extends React.Component {
constructor(props) {
super(props);
console.log(this.props.userName, "Child Component constructor");
}
componentDidMount(): void {
console.log(this.props.userName, "Child Component mounted");
}
componentDidUpdate(): void {
console.log(this.props.userName, "Child Component updated");
}
componentWillUnmount(): void {
console.log(this.props.userName, "Child Component unmounted");
}
handleCounterUpdate = () => {
this.props.onCounterUpdate(); // Call the passed function
};
render(): React.ReactNode {
console.log(this.props.userName, "Child Component render");
return (
<div>
<br />
Count: {this.props.count} <br />
<button onClick={this.handleCounterUpdate}>Increase counter</button>
</div>
);
}
}
export default Child;
The initial output after the first render is the same as before
But what will happen when we click the Increase Counter button?
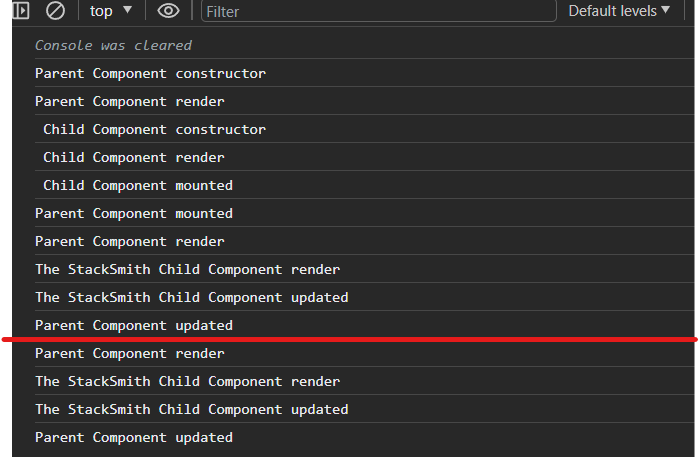
Yes, it’s the exact operations as before.
Summary
-
After the Parent Component’s ComponentDidMount is called, the state changes and React needs to display the latest changes.
After an update operation, React again re-renders the component.
-
So now the Parent Component’s render method is called again subsequently calling the Child Component’s render method as well, and logs the following.
-
Parent Component render
-
The StackSmith Child Component render
-
Since the component has been updated with a new value, the child component now calls its ComponentDidUpdate method.
-
The StackSmith Child Component updated
-
Similar to how the Child Component called its “ComponentDidUpdate” method after the prop value was updated, the Parent Component also calls its “ComponentDidUpdate” method after the child component has finished rendering.
-
After the Increment Counter button is clicked, these steps are again repeated.
Tricky Interview Question
Suppose we have a setInterval in the componentDidMount method.
componentDidMount(): void {
this.timer = setInterval(()=> {
console.log( "Child Component mounted");
}, 1000)
}
Now after the component with the interval is loaded we move away from the current page. What do you think will happen? Will the timer reset?
No, the timer will not reset and continue to run in the background. If we move away from the current page, i.e. unmount the component and move back to the current page with the Interval Timer, the timer method will mount again, thus creating two timers that will log “Child Component mounted” on the screen at different intervals, i.e. 500ms. And if we move back and forth between the pages, the timer will keep on mounting on the page instead of resetting.
This causes a lot of memory leaks and performance issues.
Now you might already know which lifecycle method we will use here to free up the memory right?
componentWillUnmount(): void {
clearInterval(this.timer)
}
The “componentWillUnmount” method is usually used to clear up the memory after the component is unmounted from the screen. This usually involves clearing the timer, the Interval, or any other tasks that may cause memory leakage if not handled properly.
Never Compare React Lifecycle Methods To Functional Components
Even I have been guilty of this. I had learned functional components at first and while studying Lifecycle Methods, I tried comparing them with functional methods, hoping that it would make my understanding better. But comparing different lifecycle methods led me to “useEffect” hook every time.
I am not saying we can’t relate to it but understanding “componentdidMount”, “componentDidUpdate”, “componentWillUnmount”, and other lifecycle methods separately and then relating them is a better approach and will strengthen our foundation even better.
Now since we have already covered the lifecycle methods. Let’s look at some of the examples now.
Suppose in the class-based method,
-
We need to run the “componentDidMount” method, In “useEffect” we do
useEffect((e)=>{
console.log( "Child Component mounted")
}, [])
When we leave the dependency array blank, it only runs once while the page loads.
But if we do this,
useEffect((e)=>{
console.log( "Child Component mounted")
})
i.e. omit the dependency array. The “useEffect” runs after every render, and you will not be completely wrong to think of this as a form of “componentDidUpdate”.
-
We need to keep track of the userInfo object and see if any changes have been made. How would we do that?
In class-based components, we would do
componentDidUpdate(prevProps: Readonly<{}>, prevState: Readonly<{}>):
void {
if (this.state.userInfo.name !== prevState.userInfo.name){
console.log("State Changed")
}
if (this.state.userInfo.email !== prevState.userInfo.email){
console.log("State Changed")
}
if (this.state.userInfo.phone !== prevState.userInfo.phone){
console.log("State Changed")
}
}
You can see how cumbersome this is. Now how would we keep track of the userInfo object using the “useEffect” hook?
useEffect((e)=>{
userInfo.name = e.target.value
}, [userInfo])
And if we needed to track more objects we would just write another “useEffect” for it.
-
Now how would we handle the “componentWillUnmount”, to free up our memory
useEffect(()=>{
const timer = setInterval(()=>{
console.log("Timer")}, 1000);
return clearInterval(timer)
}, [])
Using the return keyword, we will handle the “componentWillUnmount” method.
As you can see, everything is handled by “useEffect”, but while learning at first and trying to understand the lifecycle we have to think about whether to leave the dependency array blank, not include it, or add a state variable to it, and even when to use the return keyword. And if we mess it up unknowingly we might just spin around in circles in parts where we simply didn’t have to. So understanding lifecycle methods separately and then relating it to the functional component equivalence is the best approach we can follow while learning the lifecycle methods😀.
Few Questions
-
Do you know why we use super(props)?
-
Why are component mount, update, and unmount being called at last after the page loads?
-
When a component updates, does the state DOM update to reflect the changes or does the entire component re-render?
 Click Here